Quantcast
Channel: Kris Halsrud – Customer FX
Viewing all 168 articles
Browse latest View live

Infor CRM (Formerly Saleslogix) Error in the Web Client- Invalid usage of the option NEXT in the FETCH statement. : Incorrect syntax near ‘OFFSET’

$
0
0

 I recently ran into a web client system that was unable to operate properly.  Whenever a page opened, the following error would be thrown:

The following SData diagnosis occurred: Description=Operation failed. Message=Invalid usage of the option NEXT in the FETCH statement. : Incorrect syntax near ‘OFFSET’. HTTP status: Internal Server Error (500).

The solution to this is something simple that I had ran into before.  Luckily my senility hadn’t yet reached that memory bank.  Here is how to fix this issue:

In the Saleslogix Connection Manager on the server someone had chosen the 2012 SQL Client (SQLNCLI11.1) rather than the 2010 SQL Client as the SQL OLE DB Provider to use to connect to the database.

After redefining the connection using the other provider, and an IIS reset- Kamblam! A working web site!


Infor CRM (Formerly Saleslogix) v8.1 update 03 and 05- Uncaught Error Scheduling Contact Processes

$
0
0

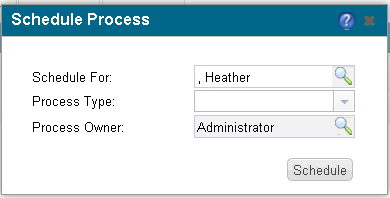
 In the Infor CRM (formerly Saleslogix) web client, under the Contact area you have the ability to schedule a Contact Process via the Processes tab.  When you click the + to schedule a Process the following dialog opens:


If you don’t select a Process in the “Process Type” field and click Schedule you get an uncaught error that is not informative:


We can change this fairly easily.  The dialog that is launched when you click the + is a custom Contact smart part called ScheduleProcess.  This smart part has a separate code file named ScheduleProcess.ascx.cs.  Within that code file there is a method cmdSchedule_Click.  The code looks like the following:

    protected void cmdSchedule_Click(object sender, EventArgs e)
    {
        if (lueContactToScheduleFor.LookupResultValue == null)
        {
            throw new ValidationException(GetLocalResourceObject(“error_ScheduleFor.Message”).ToString());
        }       
        try
        {
            LoadOwner();
            if (cboProcessType.DataSource != null)
            {
                Plugin selectedPlugin = ((IList<Plugin>) cboProcessType.DataSource)[cboProcessType.SelectedIndex];
                object[] objarray = new[]
                                        {
                                            lueContactToScheduleFor.LookupResultValue,
                                            selectedPlugin.PluginId,
                                            selectedPlugin.Family,
                                            selectedPlugin.Name,
                                            ownProcessOwner.LookupResultValue
                                        };
                Sage.Platform.Orm.DynamicMethodLibraryHelper.Instance.Execute(“Contact.ScheduleProcess”, objarray);
                DialogService.CloseEventHappened(sender, e);
                IPanelRefreshService refresher = PageWorkItem.Services.Get<IPanelRefreshService>(true);
                refresher.RefreshTabWorkspace();
            }
            else
            {
                DialogService.ShowMessage(GetLocalResourceObject(“Error_ProcessTypes”).ToString(), “SalesLogix”);
            }
        }
        catch (Exception ex)
        {
            string sSlxErrorId = null;
            var sMsg = ErrorHelper.GetClientErrorHtmlMessage(ex, ref sSlxErrorId);
            if (!string.IsNullOrEmpty(sSlxErrorId))
            {
                log.Error(
                    ErrorHelper.AppendSlxErrorId(
                        “The call to SmartParts_Process_ScheduleProcess.cmdSchedule_Click failed”, sSlxErrorId), ex);
            }
            DialogService.ShowHtmlMessage(sMsg, ErrorHelper.IsDevelopmentContext() ? 600 : -1,
                                          ErrorHelper.IsDevelopmentContext() ? 800 : -1);
        }
    }


We can add a new line after the initial if statement that is checking for the existence of a contact.  Our line will check the Process Type combo box:

    if (string.IsNullOrWhiteSpace(cboProcessType.Text)) throw new ValidationException(“No process is specified”); //CFX

So the final code looks like:

    protected void cmdSchedule_Click(object sender, EventArgs e)
    {
        if (lueContactToScheduleFor.LookupResultValue == null)
        {
            throw new ValidationException(GetLocalResourceObject(“error_ScheduleFor.Message”).ToString());
        }       

    if (string.IsNullOrWhiteSpace(cboProcessType.Text)) throw new ValidationException(“No process is specified”); //CFX


        try
        {
            LoadOwner();
            if (cboProcessType.DataSource != null)
            {
                Plugin selectedPlugin = ((IList<Plugin>) cboProcessType.DataSource)[cboProcessType.SelectedIndex];
                object[] objarray = new[]
                                        {
                                            lueContactToScheduleFor.LookupResultValue,
                                            selectedPlugin.PluginId,
                                            selectedPlugin.Family,
                                            selectedPlugin.Name,
                                            ownProcessOwner.LookupResultValue
                                        };
                Sage.Platform.Orm.DynamicMethodLibraryHelper.Instance.Execute(“Contact.ScheduleProcess”, objarray);
                DialogService.CloseEventHappened(sender, e);
                IPanelRefreshService refresher = PageWorkItem.Services.Get<IPanelRefreshService>(true);
                refresher.RefreshTabWorkspace();
            }
            else
            {
                DialogService.ShowMessage(GetLocalResourceObject(“Error_ProcessTypes”).ToString(), “SalesLogix”);
            }
        }
        catch (Exception ex)
        {
            string sSlxErrorId = null;
            var sMsg = ErrorHelper.GetClientErrorHtmlMessage(ex, ref sSlxErrorId);
            if (!string.IsNullOrEmpty(sSlxErrorId))
            {
                log.Error(
                    ErrorHelper.AppendSlxErrorId(
                        “The call to SmartParts_Process_ScheduleProcess.cmdSchedule_Click failed”, sSlxErrorId), ex);
            }
            DialogService.ShowHtmlMessage(sMsg, ErrorHelper.IsDevelopmentContext() ? 600 : -1,
                                          ErrorHelper.IsDevelopmentContext() ? 800 : -1);
        }
    }

This results in a much nicer message:


Infor CRM (Formerly Saleslogix) Problem with Multiple Timezone Controls in the Web Client

$
0
0

I just ran into an issue on 8.1.3 that I hadn’t seen before.  A client wanted the time zone control added to the Contact details screen, that normally resides on the Details tab.  We were experiencing strange things when testing the Contact screen, where the progress bar indicator never stopped working.  It turns out that having a Timezone control loaded twice on the same page was throwing java script errors in the underlying dojo code because it was trying to instantiate objects that already existed due to the other control.  This only happened when the Details tab was active as it then tried to render both controls (The Contact Detail version and the Details tab version). 


The solution was to remove the control from the Details tab so it only existed one time.


Infor CRM (Formerly Saleslogix) Getting the Current User and Contact Context in the Web Custom Portal

$
0
0

Ryan Farley previously posted about how to get the current Contact context in the Customer Web Portal.  This same approach can be used to determine the Saleslogix User context that the Customer Portal is running under. 

Expanding on Ryan’s initial post by calling a different service, like so:

Sage.SalesLogix.Security.IWebPortalUserService service = Sage.Platform.Application.ApplicationContext.Current.Services.Get<Sage.Platform.Security.IUserService>() as Sage.SalesLogix.Security.IWebPortalUserService;
            if (service != null)
            {
            Sage.Entity.Interfaces.IContact con = service.GetPortalUser().Contact;
            string contactID = con.Id.ToString();           
            }

Sage.SalesLogix.Security.IWebPortalUserService service2 = Sage.Platform.Application.ApplicationContext.Current.Services.Get<Sage.Platform.Security.IUserService>() as Sage.SalesLogix.Security.IWebPortalUserService;
            if (service2 != null)
            {
            Sage.Entity.Interfaces.IUser usr = service2.GetUser() as Sage.Entity.Interfaces.IUser;
                string userID = usr.Id.ToString();
            }

Infor CRM (Formerly Saleslogix) Allowing quickforms to be used within the Web Browser control in the web client

$
0
0

 The Infor CRM web client has a “browser control” that allows you to embed another smart part onto a smart part.  This is what is used for the Opportunity snapshot area on the Oppoertunity Detail page.  Normally only custom smart parts are used in the OOTB implementation.  It is possible to use quickforms, however there is a current bug with how quickforms are constructed that prevent you from using them, unless you do the following step.  This is because the quickforms use a template to add a design button to the form, however this doesnt work within the browser control.  TO get around this limitation, follow these steps:

In the Application Architect, in the Virtual File System Explorer (Control + Alt + F), expand out Model…Quickforms…Web

Locate the file  QuickForm2Web.vm.  Double click this file.

In the normal v8.1  version of this file, on line 96 you should see the following:

 $generator.addToFormLoadCode(“if (!RoleSecurityService.HasAccess(${Q}Administration/Forms/View${Q}))”)

Change that to be:

$generator.addToFormLoadCode(“if (RoleSecurityService!=null && !RoleSecurityService.HasAccess(${Q}Administration/Forms/View${Q}))”) 

Save the changes to the file.

Now when you build and deploy you will be able to place quickforms within the web browser control.

Infor CRM (Formerly Saleslogix) Embedding quickforms on quickforms

$
0
0

 I recently had a client who needed to have a lot of elements on a form.  They wanted a kind of “Back” “Next” functionality where the user could scroll through a series of screens.  How to do that?  Well the solution I came up with was to use a panel control, and then load a smartpart onto that panel control.  Lets look at how to do this:

Here is a very simple step-through:

On a quickform we’ll call FormMain, add a Panel control called pnlControl
Add 2 buttons to the FormMain quickform.
Add a hidden fields to the form called QFHidden

On the load Action of the FormMain quickform, add the following code snippet (make sure to set the OnRepaint property to true):

//Load Action
if (string.IsNullOrEmpty(QFHidden.Value))
{
    QFHidden.Value=”Test1″;
}
string controlPath = string.Format(“~/SmartParts/Account/{0}.ascx”,QFHidden.Value);
UserControl uc = (UserControl)Page.LoadControl(controlPath);
Sage.Platform.WebPortal.SmartParts.SmartPart sp = uc as Sage.Platform.WebPortal.SmartParts.SmartPart;
if (sp != null)
{
    sp.InitSmartPart(ParentWorkItem, PageWorkItem.Services.Get<Sage.Platform.Application.UI.Web.IPageWorkItemLocator>());
    sp.DialogService = DialogService;
    Sage.Platform.WebPortal.SmartParts.EntityBoundSmartPart esp = sp as Sage.Platform.WebPortal.SmartParts.EntityBoundSmartPart;
    if (esp != null)
    {
        esp.InitEntityBoundSmartPart(PageWorkItem.Services.Get<Sage.Platform.Application.IEntityContextService>());
    }
}
pnlControl.Controls.Add(uc);

Now on the 1st button on the FormMain quickform, add the following code on the click event:
QFHidden.Value=”Test1″;

And on the 2nd button on the FormMain quickform, add the following code on the click event:
QFHidden.Value=”Test2″;

So what this code does is set the hidden field with a value of either “Test1” or “Test2” when the appropriate button is clicked.  Then the load action on the page (remember we set the OnRePaint=true so it runs each postback) the system looks at the value stored in the hidden field, then goes and gets a smartpart in the Account folder with the name matching what is in the hidden field (i.e. Test1.ascx or Test2.ascx).  It the creates a user control for that smartpart and loads it onto the panel control.

Pretty cool.

Infor CRM (Formerly Saleslogix) Adding a Client Side Confirmation on a Dependency Lookup in the Web Client

$
0
0

 We recently had a client who wanted to have a user confirmation prompt before a user was allowed to make a change to a dependency lookup.  This was because there were rules in place that significantly altered data upon a value being changed from one thing to another.  The particular control that this was for was the Dependency Lookup control.  Normally this control does not have any kind of confirmation message but by examining the elements in the DOM I was able to figure out how to do it by injecting client side code on the page load.  lets take a look at the script I used:

    string script = “function confirmChange() { ”
    script += “return confirm(‘Changing this will cause something really neat to happen.  Click OK if you want to continue.’);} ”    
    script += “document.getElementById(‘” + dplArea.ClientID + “_Area_ShowBtn‘).setAttribute(‘onclick’,’return false;’);”; 
    script += “var dpLookup = $(‘#” + dplArea.ClientID + “_Area_ShowBtn‘);”    
    script += “dpLookup.unbind(‘click’);dpLookup.click(function() { if (!confirmChange()) { ”
    script += “document.getElementById(‘” + dplArea.ClientID + “_Area_ShowBtn‘).setAttribute(‘onclick’,’return false;’); } ”
    script += “else document.getElementById(‘” + dplArea.ClientID + “_obj”‘).Show()});”

    ScriptManager.RegisterStartupScript(Page, GetType(), “FXCheckProduct”, script, true); 


There are several highlighted bits.  In my case my lookup control was called dplArea so I added that control’s client ID into the script in the various places.  The other highlighted bits “_Area_ShowBtn”, in conjunction with the client ID, is the DOM for the actual button of the lookup.  Since the top level lookup in the Dependency Lookup was named Area, that is why it is called “_Area_ShowBtn”.  You can examine your control on the page to see what your particular control is named.

The important thing to note here is  I first remove the normal click action of the control using the first lline like this:

     script += “document.getElementById(‘” + dplArea.ClientID + “_Area_ShowBtn’).setAttribute(‘onclick’,’return false;’);”;  

This is so that after the confirmation, the normal popup of the lookup doesn’t occur.

The other thing to note is that I am using the unbind method to remove all previous click actions.  This is because otherwise, you end up getting your confirmation message re-added each time a postback happens, causing the user to get prompted over and over once they do click the button:

    script += “dpLookup.unbind(‘click’);dpLookup.click(function() { if (!confirmChange()) { ” 

Finally the whole script is added to the page using the RegisterStartupScript.  This code was added as a C# code snippet on the quick form’s load event, making sure the OnRepaint event is set to True.


Infor CRM (Formerly Saleslogix) Mobile 3.x Web Client Picklist Attributes

$
0
0

 I recently was asked how to define picklists in the mobile client to follow the validation logic that the full web client does.


lets look at how to add a fully new picklist to a form, in this case the edit address screen, to add the County field in.

            // add county
            this.registerCustomization(‘edit’, ‘address_edit’, {
                at: function(row) { return row.name == ‘Country’; },
                type: ‘insert’,
                where: ‘before’,
                value: {
                    label: ‘county’,
                    name: ‘County’,
                    property: ‘County’,
                    type: ‘picklist’,
                    picklist: ‘County’,
                    requireSelection: true,
                    title: ‘county’,
                    validator: [
                        validator.exists,
                        validator.exceedsMaxTextLength
                    ]
                }
            });   
   

The two highlighted lines above show what needs to be set.

requireSeclection: true makes typing into the picklist control not possible.  Instead, as soon as you click in to the field the picklist popup occurs and you have to choose one of the items.  This is the equivalent to “item must match”.

validator.exists prevents the “none” option at the top of the list of picklist items.  it also throws an error if trying to save without choosing a value.  This is the equivalent of the “Required entry”.

If you wanted to modify an existing picklist on a form instead of adding a new one the code would look like this:

            // modify country
            this.registerCustomization(‘edit’, ‘address_edit’, {
                at: function(row) { return row.name == ‘Country’; },
                type: ‘modify’,               
                value: {                   
                    requireSelection: true,                   
                    validator: [
                        validator.exists,
                        validator.exceedsMaxTextLength
                    ]
                }
            });
    

Oh and finally to make multi-select you would do something like          
           

             // modify country
            this.registerCustomization(‘edit’, ‘address_edit’, {
                at: function(row) { return row.name == ‘Country’; },
                type: ‘modify’,               
                value: {                   
                    requireSelection: true,
                    multiSelect: true,                  
                    validator: [
                        validator.exists,
                        validator.exceedsMaxTextLength
                    ]
                }
            }); 


Infor CRM (Formerly Saleslogix) Hiding Tabs at Runtime Without Using Modules

$
0
0

 As Ryan wrote a long time ago, you can create a module and add it to a page in the Infor CRM web client to show or hide things like menus, or tabs.

Problem is that this functionality doesn’t work well starting in 8.1 with update 05 as the modules no longer run as you switch records client side, using the group pane or VCR group navigator buttons.  This means the module runs the first time you open the page but not subsequently as you switch records unless you do a full refresh again.  This problem is detailed here.

Creating modules seems overkill and a big pain to make this happen.  What you can do instead is to use similar code either directly on a quick form, in the load action, or by creating a global code file in the app_code folder and then calling that directly. 

To load it onto a quick form you need to get a little creative.  Quick forms only offer the ability to add a single function at a time and we will need to add some variables and service dependencies.  This can be done by messing with how quick forms get rendered.  if you think about when you add code to the load action you simply type in the code you want and then when the smart part is constructed it wraps your code in a code stub.  So if you did something like this in a load action:

string myVar = “hello there”;

When the quick form is deployed it becomes

protected void QuickFormLoad0 ()

{

   string myVar = “hello there”;

}

So what this means is we can add our own code and add an extra } at the end, that way we could type something like:

   string myVar = “hello there”;

}

protected void myCoolFunction()

{

string myVar = “I fooled  Saleslogix.  Yah!”;

That way when it is built we end up with

protected void QuickFormLoad0 ()

string myVar = “hello there”;

}

protected void myCoolFunction()

{

string myVar = “I fooled  Saleslogix.  Yah!”;

}

 The important thing to notice is I add one extra } after my load action code and leave off the closing } after my custom function.

On to the details

So with knowing that, lets take a look at how we do this:

The first thing is to add our code that will run on the load action:

    Sage.Platform.WebPortal.Workspaces.Tab.TabWorkspace tabContentWorkspace = null;
    try
    {
        string id = string.Empty;
        tabContentWorkspace = this._parentWorkItem.Workspaces[“TabControl”] as Sage.Platform.WebPortal.Workspaces.Tab.TabWorkspace;
        Sage.Platform.Application.IEntityContextService entityContext = this._parentWorkItem.Services.Get<Sage.Platform.Application.IEntityContextService>();
        if (entityContext.HasEntityContext)
        {
            id = entityContext.EntityID.ToString();
        }
        Sage.Entity.Interfaces.IAccount buyer = Sage.Platform.EntityFactory.GetById<Sage.Entity.Interfaces.IAccount>(id);

        if (tabContentWorkspace != null && buyer != null && !string.IsNullOrEmpty(buyer.Type))
        {
            string type = buyer.Buyer.ToLower();
            foreach (Sage.Platform.WebPortal.Workspaces.Tab.TabInfo sp in tabContentWorkspace.Tabs)
            {               
                tabContentWorkspace.Hide(“someTabID”, type == “prospect”);  
            }
        }
    }
    catch (Exception exception)
    {
       throw new Sage.Platform.Application.ValidationException(“oops we have a problem”);
    }

}

Again notice, I have an extra } at the end.  Now right below this we need to add some dependencies our code is using:

private Sage.Platform.Application.UI.UIWorkItem _parentWorkItem;
[Sage.Platform.Application.ServiceDependency(Type = typeof(Sage.Platform.Application.WorkItem))]
public Sage.Platform.Application.UI.UIWorkItem ParentWorkItem
{
    get
    {
        return this._parentWorkItem;
    }
    set
    {
        this._parentWorkItem = value;
    }

Again, notice I have left off the last closing bracket.

This code sample assumes this is running on the account screen and will run when the quick form loads and hide the smart part tab called “someTabID” when the current account’s type=”Prospect”

Please note I have only had success using this when there are no other modules on the page :(.  Using on a standard screen like Account details doesnt seem to work as other modules override what we are doing here, so for thos a module approach is still the way to go.  BOOO!


Infor CRM (Formerly Saleslogix) Iterating through all tabs on a Page

$
0
0

Using the TabWorskpace you can iterate through all the tabs on a page and do something with them, like show or hide them.  To do this you need the following code:

private Sage.Platform.Application.UI.UIWorkItem _parentWorkItem;
[Sage.Platform.Application.ServiceDependency(Type = typeof(Sage.Platform.Application.WorkItem))]
public Sage.Platform.Application.UI.UIWorkItem ParentWorkItem
{
    get
    {
        return this._parentWorkItem;
    }
    set
    {
        this._parentWorkItem = value;
    }
}

protected void QuickFormLoad0()
{
    Sage.Platform.WebPortal.Workspaces.Tab.TabWorkspace tabContentWorkspace = null;
    try
    {
        string id = string.Empty;

        tabContentWorkspace = this._parentWorkItem.Workspaces["TabControl"] as Sage.Platform.WebPortal.Workspaces.Tab.TabWorkspace;

        Sage.Platform.Application.IEntityContextService entityContext = this._parentWorkItem.Services.Get<Sage.Platform.Application.IEntityContextService>();

        if (entityContext.HasEntityContext)
        {
            id = entityContext.EntityID.ToString();
        }

        Sage.Entity.Interfaces.IAccount buyer = Sage.Platform.EntityFactory.GetById<Sage.Entity.Interfaces.IAccount>(id);

        if (tabContentWorkspace != null && buyer != null)
        {            
            foreach (Sage.Platform.WebPortal.Workspaces.Tab.TabInfo sp in tabContentWorkspace.Tabs)
            {                
                tabContentWorkspace.Hide(sp.ID, true);   
            }
        }
    }
    catch { }
}

Infor CRM (formerly Saleslogix) Web Client- Disabling a ComboBox at run time

$
0
0

The ComboBox control on a quickform renders as an ASP.Net Listbox control.  If you want to set the control to disabled, you would think adding a code behind of:

control.Enabled=false;

Would disable the control. Well you would be wrong.  This is due to a change in the ASP.Net v4 runtimes, as described here.  Instead what you need to do is add a different line of code:

control.Attributes.Add(“disabled”, “disabled”);

To re-enable the control in code, you can then call the opposite:

control.Attributes.Remove(“disabled”); 


More on Infor CRM triggers introduced in v8.1

$
0
0

In a previous post, I talked about new triggers introduced in the 8.1 upgrade process. Those triggers have issues with data being added to the database causing unnecessary bloat unless you actually are using the ERP integrations, which very few people do.

We discovered another issue with them today- with the triggers in place you will no longer be able to delete accounts added with the triggers in place. This is because on of the triggers on the account table (ACCOUNT_INT_INSTEAD_INS) adds a GUID to the field ACCOUNT.GLOBALSYNCID. The standard OnBeforeDelete Account entity event now validates that that field does not contain data. If it does you get an error saying you can’t delete the account. The message you will receive is “X Account is currently linked with . You cannot delete accounts which are currently lined”. Aside from the error message misspelling *sigh*, this kind of causes a problem!

The solution for this is:
1) Clear any accounts with a GLOBALSYNCID: update sysdba.ACCOUNT set globalsyncid=null where globalsyncid is not null
(You may also want to do the same for CONTACT, ADDRESS, ACTIVITY, and USER_ACTIVITY as these also have triggers which populate a GLOBALSYNCID in each of those tables. Just repeat the same sql statement above but replace ACCOUNT with the different table names.)
2) Disable the SQL triggers. The easiest way to do this is to run the following SQL statement:

Disable trigger ACCOUNT_INT_INSTEAD_INS on sysdba.ACCOUNT
go
Disable trigger ACCOUNT_INTEGRATION_INSERT on sysdba.ACCOUNT
go
Disable trigger ACCOUNT_INTEGRATION_CHANGE on sysdba.ACCOUNT
go
Disable trigger ACCOUNT_TOMBSTONE on sysdba.ACCOUNT
go
Disable trigger ACTIVITY_INT_INSTEAD_INS on sysdba.ACTIVITY
go
Disable trigger ACTIVITY_INTEGRATION_INSERT on sysdba.ACTIVITY
go
Disable trigger ACTIVITY_INTEGRATION_CHANGE on sysdba.ACTIVITY
go
Disable trigger ACTIVITY_INT_INSTEAD_INS on sysdba.ACTIVITY
go
Disable trigger ACTIVITYATTENDEE_INT_INSTEAD_INS on sysdba.ACTIVITYATTENDEE
go
Disable trigger ACTIVITYATTENDEE_INTEGRATION_CHANGE on sysdba.ACTIVITYATTENDEE
go
--Disable trigger ACTIVITYATTENDEE_COUNT on sysdba.ACTIVITYATTENDEE
--go
Disable trigger ADDRESS_INT_INSTEAD_INS on sysdba.ADDRESS
go
Disable trigger ADDRESS_INTEGRATION_CHANGE on sysdba.ADDRESS
go
Disable trigger ADHOCGROUP_INTEGRATION_TOMBSTONE on sysdba.ADHOCGROUP
go
Disable trigger ADHOCGROUP_INTEGRATION_INSERT on sysdba.ADHOCGROUP
go
Disable trigger CONTACT_TOMBSTONE on sysdba.CONTACT
go
Disable trigger CONTACT_TOMBSTONE on sysdba.CONTACT
go
Disable trigger CONTACT_INT_INSTEAD_INS on sysdba.CONTACT
go
Disable trigger CONTACT_INTEGRATION_INSERT on sysdba.CONTACT
go
Disable trigger USERACTIVITY_INT_INSTEAD_INS  on sysdba.USER_ACTIVITY
go
Disable trigger USERACTIVITY_TOMBSTONE  on sysdba.USER_ACTIVITY
go
Disable trigger USERACTIVITY_INTEGRATION_CHANGE on sysdba.USER_ACTIVITY
go
Disable trigger USERACTIVITY_INT_INSTEAD_INS on sysdba.USER_ACTIVITY
go

3) Delete the trigger definitions from the DB_OBJECTDEFINITION definition table. Again use the following SQL:

Delete from sysdba.DB_OBJECTDEFINITION where objectname in (
'ACCOUNT_INTEGRATION_INSERT'
,'ACCOUNT_INTEGRATION_CHANGE'
,'ACCOUNT_TOMBSTONE'
,'ACTIVITY_INTEGRATION_INSERT'
,'ACTIVITY_INTEGRATION_CHANGE'
,'ACTIVITY_INT_INSTEAD_INS'
,'ACTIVITYATTENDEE_INT_INSTEAD_INS'
,'ACTIVITYATTENDEE_COUNT'
,'ACTIVITYATTENDEE_INTEGRATION_CHANGE'
,'ADDRESS_INTEGRATION_CHANGE'
,'ADHOCGROUP_INTEGRATION_TOMBSTONE'
,'CONTACT_TOMBSTONE'
,'CONTACT_INTEGRATION_CHANGE'
,'CONTACT_INTEGRATION_INSERT'
,'USERACTIVITY_TOMBSTONE'
,'USERACTIVITY_INTEGRATION_CHANG'
,'USERACTIVITY_INT_INSTEAD_INS'
,'CONTACT_INT_INSTEAD_INS'
,'ACCOUNT_INT_INSTEAD_INS'
,'ADDRESS_INT_INSTEAD_INS'
)

A word of warning, do these things only if you are NOT USING the ERP integrations that Infor has designed these for.

Word Wrap Not Working in Infor CRM 8.1.x and Newer on IE 11

$
0
0

We have had a few recent customers complain the textboxes are not properly wrapping text when using Internet Explorer 11 to view the Infor CRM web client.  The issue does not appear to happen in IE 10.

Luckily there is a simple fix for this that fixes the IE wrap and does not impact other browser functionality.

The key is to modify 2 css files in the Infor CRM virtual file system.

Within both the layout.css and sage-style.css there is a style definition for textarea classes that looks like this

.textcontrol textarea,
.twocoltextcontrol textarea,
.threecoltextcontrol textarea
{
	overflow: auto;
}

This should be changed to

.textcontrol textarea,
.twocoltextcontrol textarea,
.threecoltextcontrol textarea
{
    /*overflow: auto;*/
    word-wrap:break-word !important;
    word-break:normal !important;    
    white-space: pre-wrap !important;
}

Please note there are several different definitions that are similar for textareas. You just want to change the one with the overflow: auto; definition.

Sorting a SlxGridView web control using Linq

$
0
0

In a previous post, I described  how you can sort a grid in the 7.5x level of Infor CRM (formerly Saleslogix).  Apparently in 8.1x that method doesn’t work but you can also do the same using Linq.

Lets say I am on the Account page and want to sort the contact grid by CreateDate in descending order.  I can use the following code to do so:

Sage.Entity.Interfaces.IAccount acc = this.BindingSource.Current as Sage.Entity.Interfaces.IAccount; 
var orderedList = acc.Contacts.OrderByDescending(x => x.CreateDate); 
grdContacts.DataSource = orderedList; 

To sort ascending you would just use this instead:

...
var orderedList = acc.Contacts.OrderBy(x => x.CreateDate); 
...

Extending the Infor CRM (formerly Saleslogix) Web Client Email Control for Better Validation

$
0
0

By default the email control in the Infor CRM web client has very basic, I would argue, insufficient validation of the email that a user inputs.  The standard validation simply checks for a string like *@*, where the * can be anything except a < or space.  That leaves a lot of room for bad data.


Lets take a look at how to fix this.  We are going to be extending the control.  The nice thing about doing this is that it will automatically take affect for any email control in the web client, regardless of what screen the field exists on.  There are a couple of steps to doing this.  I am going to skip some of the details, but this should give you a good step by step for those who know their way around the Application Architect.

Step 1

Add a new folder within the jscript folder.  This is to contain the javascript files we will use to extend the control.  I would recommend naming it something like your company name.  I will call mine CFX.

Step 2

Inside this folder we need to create a new main.js javascript file. in here we wire up the main initialization of our custom control extension. here is the code for that:

define([
    'CFX/CustomControlsModule',
],
    function (CustomControlsModule) {
    var customControlsModule = new CustomControlsModule();
    customControlsModule.initailize();
});

Make note you need to be consistent with the prefix you are adding in these js files. In mine I am prefixing as CFX.

Step 3

Inside the same folder, add another js file called CustomControlsModule.js. This is where we are actually going to extend the base email control. We need to pass in the Email control. Remember again to consistently prefix your stuff, as I have done with CFX. Here is the code:

define('CFX/CustomControlsModule', [
        'dojo/_base/declare',
        'dojo/ready',
        'dojo/aspect',
        'dojo/_base/lang',
        'Sage/UI/Controls/Email'
],
function (declare,
            ready,
            aspect,
            lang,
            email
        ) {
    var customControlsModule = declare('CFX.CustomControlsModule', null, {
        initailize: function () {
            lang.extend(Sage.UI.Controls.Email, {                
                regExpGen: function () {                                                          
                    var validationString = "^([\\w\\.\\-_']+)?\\w+@[\\w-_]+(\\.\\w+){1,}$";
                    return validationString;
                }
            });
        }
    });
    return customControlsModule;
});

The standard email control has a regExpGen property that we are replacing with our version when the custom extension is initialized. You can see the standard unminified version of the Email control’s js file in Jscript/Sage/UI/Controls/Email.js. you cant modify this directly, hence our extension of it. The property contains a function that returns a Regex expression.
The standard looks like this:

var validationString = "[^< ]+@[^< ]+\\.+.[^< ]*?";

Ours looks like

validationString = "^([\\w\\.\\-_']+)?\\w+@[\\w-_]+(\\.\\w+){1,}$";

One thing to note is that the escape character within the normal regex string needs to be escaped again (i.e.. \\).

Step 4
The last step is to wire up the web client to actually use our new spiffy javascript. We do this by modifying the base.master file. This master file is used by all the pages in the web client and is where all of the javascript files actually get wired up. We need to look for 2 spots to update.

Search for “var dojoConfig = {“. You will see this contains a paths property that will look like:

paths: { 'Sage': '../../../jscript/Sage'},

We need to change this to also add the path to our new folder (in my case CFX):

paths: { 'Sage': '../../../jscript/Sage', 'CFX': '../../../jscript/CFX'},

Lastly we need to invoke our main.js which is the entry point to our custom stuff. Again, search for an area in the code that looks like:

<script type="text/javascript">
        require([
            "dojo/_base/html",

There are a whole bunch of items in this list. At the very end we need to add one more, ours. Type this after the last require statement:

,"CFX/main"

That is all there is to it. Redeploy the web client and take a look. Your email validations should be much more robust now.

Extending the v8.x Infor CRM (formerly Saleslogix) Entity Model to Allow for Extended Entity Audit Logging

$
0
0

One of the great things about the entity model in the Infor CRM web is the ability to easily set up auditing on changes to fields in an entity. All you need to do is set up a history table and then simply check the entity properties you wish to have audited.

One shortcoming that has always existed is the ability to audit extended entities off the main entity. These extended entities represent one-to-one tables. In the Application Architect you can define the table to record History based on the parent table by default. However if you choose to do that and then attempt to make a change in the web client to one of the extended entities property you get a casting error. For instance if you have an extended entity off ITicket called ITicketExt you would get an error when you try to record a history change to a property in the ITicketExt entity saying unable to convert ITicketExt to ITicket. This is because the Ticket history table expects a parent of type ITicket, not ITicketExt. If we look at how a entity is implemented (which is where the auditing is wired up) we can see it contains a method called NewAuditEntry. This is where the casting error happens. Here is that code:

        public override object NewAuditEntry()
        {
            IAuditTable at = (IAuditTable)EntityFactory.Create(typeof(ITicketHistory));                      
            at.SetEntity(this);            
            return at;
        }

We can see that is is attempting to set the audit table objects parent to this. This works great if this id the Ticket but if you are trying to use the extended entity of TicketExt you will get the cast error on this line. It would be sweet if we could just change the line

at.SetEntity(this);

to

at.SetEntity(this.Ticket);

Well lets do it!

These implementations are generated dynamically when you do a web platform build. The implementations use a code template file that generates the actual implementation which is then compiled into the Sage.Saleslogix.Entities.dll. Knowing that a template is in use we can modify the core template to handle extended entities.

WARNING! MODIFY THIS ONLY IF YOU KNOW WHAT YOU ARE DOING. INCORRECT MODIFICATION CAN PREVENT YOU FROM BUILDING YOUR ENTITY MODEL. MAKE A BACKUP FIRST BEFORE MAKING THESE CHANGES SO YOU CAN REVERT TO NORMAL IF YOU BREAK SOMETHING!

Here is step by step run down.

  • Open the Application Architect and the Virtual File System Explorer.
  • In the Model/Entity Model/Code Templates/Entity folder you will see a file “Default-Class-Saleslogix.Class.codetemplate.xml
  • BACK THIS FILE UP
  • Open the file.
  • Search for “NewAuditEntry”
  • You should see a method that looks like this:
        public override object NewAuditEntry()
        {
<#  if (isHistoryTable) { #>
            IHistory h = (IHistory)EntityFactory.Create(typeof(<#= historyTypeName #>));
<#   if (entity.Name == "Address") { #>
            SetAddressHistoryKeys(h);
<#   } else { #>
<#    var aco = metadata.FindACOParent; #>
<#    if (aco != null) { #>
            h.<#= aco.Name #>Id = Id;
<#     if (aco.Name != "Account" && entity.Name != aco.Name) { #>
            h.AccountId = (string)<#= aco.Name #>.Account.Id;
            h.AccountName = <#= aco.Name #>.Account.AccountName;
<#     } #>
<#    } #>
<#   } #>
            return h;
<#  } else { #>
            IAuditTable at = (IAuditTable)EntityFactory.Create(typeof(<#= historyTypeName #>));           
            at.SetEntity(this);
            return at;
<#  } #>
        }

At the end we can see the 3 lines of code shown earlier with the at.SetEntity() line. There are parts of this code enclosed in

<# #>

tags. This is the code which runs during the construct of the web platform. The lines without these tags are what actually gets rendered into the final implementations. Knowing this we can add an if statement checking if this is an extension entity, and if so changing our SetEntity input parameter accordingly, like so:

<#if (entity.IsExtension && IsEntityIncluded(entity.ExtendedEntity)) { #>      
            at.SetEntity(this.<#= entity.ExtendedEntity.Name #>);
<#     } #>
<#   else { #>           
            at.SetEntity(this);
<#     } #>      

The final complete method looks like:

        public override object NewAuditEntry()
        {
<#  if (isHistoryTable) { #>
            IHistory h = (IHistory)EntityFactory.Create(typeof(<#= historyTypeName #>));
<#   if (entity.Name == "Address") { #>
            SetAddressHistoryKeys(h);
<#   } else { #>
<#    var aco = metadata.FindACOParent; #>
<#    if (aco != null) { #>
            h.<#= aco.Name #>Id = Id;
<#     if (aco.Name != "Account" && entity.Name != aco.Name) { #>
            h.AccountId = (string)<#= aco.Name #>.Account.Id;
            h.AccountName = <#= aco.Name #>.Account.AccountName;
<#     } #>
<#    } #>
<#   } #>
            return h;
<#  } else { #>
            IAuditTable at = (IAuditTable)EntityFactory.Create(typeof(<#= historyTypeName #>));           
<#if (entity.IsExtension && IsEntityIncluded(entity.ExtendedEntity)) { #>      
            at.SetEntity(this.<#= entity.ExtendedEntity.Name #>);
<#     } #>
<#   else { #>           
            at.SetEntity(this);
<#     } #>            
            return at;
<#  } #>
        }

After making this change, save your template file. Close the Application Architect and re-open (these templates are chached on opening). Do a build and now the implementation on an extension entity will have its method like this:

        public override object NewAuditEntry()
        {
            IAuditTable at = (IAuditTable)EntityFactory.Create(typeof(ITicketHistory));                      
            at.SetEntity(this.Ticket);            
            return at;
        }

TA-DA!

Dynamically changing a SlxGridView column headers in the Infor CRM (formerly Saleslogix) web client

$
0
0

The SLXGridView control (the older of the 2 controls available in the Infor CRM web client) inherits from the standard ASP.Net GridView as Ryan detailed.

Knowing what this control is we can then identify how to change the column header dynamically. This is normally set during the RowDataBound event, however we can also access this from within a QuickForm’s load action. Lets say I have a grid control named “myGrid” We have 2 ways of getting to a column.

One way is by index position. This is the least preferred because if you add a new column then the code may lose its intent. However to do this it is simply writing:

 myGrid.Columns[2].HeaderText = "Something Dynamic"; 

A better approach is to loop through the controls collection and then do something when you find your column, like so:

  foreach (DataControlField c in myGrid.Columns)
        {
            if (c.HeaderText == "Status") c.HeaderText = "Something Dynamic";        
        }

In order to allow this chnage to your grid you need to re-bind the grid after calling either of these with this command:

myGrid.DataBind();

Unsafe Request Errors in the Infor CRM (formerly Saleslogix) 8.2 Web Client

$
0
0

When you are running Infor CRM 8.2 there is a new setting in the web.config that attempts to validate “safe” postbacks. What this means is it throws errors when attempting to save data with special characters. This of course is likely to happen in Infor CRM where users need to enter all kind of data.

The error is something like:
The following unsafe request form value was detected: “…y Shepard <iamsafe…”. Please correct the unsafe character sequence(s). Criteria: If the < (less than sign) is followed by a letter, ! (exclamation), / (slash), or ? (question mark) it’s considered unsafe (i.e. it looks like a tag or an HTML comment); if the & (ampersand) is followed by a # (pound sign) it’s considered unsafe as well (e.g. ©). HTTP status: AjaxHttpRequestValidationResponse (580).

Luckily fixing this is fairly easy. In the web.config file look for “validateRequest”. This is on line 78 in an OOTB web.config file:

<pages validateRequest="true" enableEventValidation="false" viewStateEncryptionMode="Never">

Simply change the validateRequest from true to false:

<pages validateRequest="false" enableEventValidation="false" viewStateEncryptionMode="Never">

In addition, any version of Infor CRM that is using .NET 4.0 or higher, you’ll need to change the validation mode. Locate the web.config line that reads:

<httpRuntime requestValidationMode="4.5" targetFramework="4.5" />

and change the requestValidationMode from “4.5” to “2.0” like this:

<httpRuntime requestValidationMode="2.0" targetFramework="4.5" />

In my opinion this setting should be changed in all implementations as it is too restrictive with the kind of application that Infor CRM is.

Web Client Lookups with Multiple Conditions in Infor CRM (Saleslogix)

$
0
0

Back in the LAN client, there was a way to add multiple conditions to a lookup control, as long as you knew how to manipulate the Lookup properties to your advantage.

The web client’s lookup control is of course a different animal that now uses an SData feed to perform the lookup based on conditions. There is a pre filter property of the lookup control but you are very limited there in picking single conditions.

There is a way of doing this though by manipulating the lookup control itself. You can do so on a load action of a quick form using a C# snippet. Lets look at how you could add multiple conditions. Again by using the various attributes of the lookup control we can construct a valid SData query that will allow multiple conditions.

Let’s say we are in an Opportunity and want to show a lookup (called lookupProduct) to all Opportunity Products that are active and in the current opportunity, or some other criteria. We can use the following code to accomplish this:

    Sage.Entity.Interfaces.IOpportunity opp = this.GetParentEntity() as Sage.Entity.Interfaces.IOpportunity;
    if (opp != null)
    {
        string prods = string.Empty;       
        foreach(Sage.Entity.Interfaces.IOpportunityProduct op in opp.Products)
        {
            prods += string.Format("\"{0}\",", op.Product.Id);
        }        
        lookupProduct.SeedProperty = "(Status";
        lookupProduct.SeedValue = "Active\" and Id in (" + prods + ")) or \"A\" eq \"B";             
        lookupProduct.OverrideSeedOnSearch = false;
    }

We look through and construct a quote enclosed string of the Opportunity Products in the Opportunity.
Then we set the SeedProperty of the control to “(Status”. We add the ( in front of the property to handle the or clause logic later.
Then we set the SeedValue to the rest of our conditions. We include a quote after our first value and before our last value, because when the SeedProperty and SeedValue are appended together an opening quote and closing quote are added automatically.

With these 2 attributes, when the lookup is rendered and used, a query condition is constructed that looks like:

(Status eq "Active" and Id in ("123","456","etc.")) or "A" eq "B"

Remember this is an SData query so this is the where clause in the SData query language.

Finding What Users are Logged In from within the Infor CRM (Saleslogix) Web Client

$
0
0

The Infor CRM licensing model and enforcement is a component of the SLX Server component and is handled at the Saleslogix OLE DB Proivder level. You have access to this information from within the Administrator application via the color coded icons next to the user list showing green for those users currently logged in. There isn’t really a well defined way of getting this information any other way.

Until now!

Digging around in the web assemblies, you can find severl methods that look promising. The Sage.SalesLogix.Security assembly has a couple of promising classes called the LicenseService and the UserManagementService. Both of these have several common methods that look to be the winners. GetLicenseCount, GetLicenseAvailableCount, GetLicenseUsedCount all seem to be exactly what we want. They each accept a parameter of the LicenseType you want to get details on. To use you can do something like:

    Sage.SalesLogix.Security.UserManagementService userv = new Sage.SalesLogix.Security.UserManagementService();
    int concurrentTotal = userv.GetLicenseCount(Sage.Entity.Interfaces.UserType.Concurrent); //it does work!!
    int x = userv.GetLicenseUsedCount(Sage.Entity.Interfaces.UserType.Concurrent); //doesnt work, returns 0
    int z = userv.GetLicenseAvailableCount(Sage.Entity.Interfaces.UserType.Concurrent); //doesnt work, provides total seat license for all types
    int y = userv.GetLoggedInUsers().Count; //Doesnt work, returns 0

As you can tell by the comments there are problems with these methods. problems meaning they don’t work. in either service class.

Sigh.

Fear not, there is one more place that looks promising, the SLXConcurrentLicenseProvider class. That one has a lot less in it and the code that is there is not very helpful but it did lead me down the rabbit hole I needed to follow. Using that code as a basis I discovered the helpful SLXSystemProvider class. Using this class is the ticket. From here we gain access through COM to the provider level licensing details that you see in the Administrator! Lets take a look at how we can use it.

You can invoke this class like so:

using (Sage.SalesLogix.SLXSystemProvider provider = new Sage.SalesLogix.SLXSystemProvider())

With that present, there are now 2 key methods: GetConcurrentAvailable and LoggedInUsers

GetConcurrentAvailable accepts 3 parameters, the SLX server, the SLX port, and the Server Connection Name. All of these can be accessed using the DataService, like so:

        var datasvc = Sage.Platform.Application.ApplicationContext.Current.Services.Get<Sage.Platform.Data.IDataService>() as Sage.Platform.Data.IDataService;
        int concurrentAvailabelCnt = provider.GetConcurrentAvailable(datasvc.Server, 1706, datasvc.Alias);

The LoggedInUsers method just takes one parameter, the SLX Server Alias:

        var datasvc = Sage.Platform.Application.ApplicationContext.Current.Services.Get<Sage.Platform.Data.IDataService>() as Sage.Platform.Data.IDataService;
        string loggedInIds = string.Join(",", provider.LoggedInUsers(datasvc.Alias));

The GetConcurrentAvailable returns how many available concurrent licenses are free to use. It returns an integer.
The LoggedInUsers method returns the UserID of each logged in user.

By using each UserID returned we can parse out who they are using the normal entity model. Note, the LoggedInUser shows each user login and across any platform so if a user is logged in 3 times (Windows client, Architect, Web Client) then you see there name 3 times. Lets look at a full code block that can show details of who is logged in and breaking that down by concurrent and not:

    Sage.SalesLogix.Security.UserManagementService userv = new Sage.SalesLogix.Security.UserManagementService();
    int concurrentTotal = userv.GetLicenseCount(Sage.Entity.Interfaces.UserType.Concurrent); //it does work!!
    int x = userv.GetLicenseUsedCount(Sage.Entity.Interfaces.UserType.Concurrent); //doesnt work, returns 0
    int z = userv.GetLicenseAvailableCount(Sage.Entity.Interfaces.UserType.Concurrent); //doesnt work, provides total seat license for all types
    int y = userv.GetLoggedInUsers().Count; //Doesnt work, returns 0
    
    using (Sage.SalesLogix.SLXSystemProvider provider = new Sage.SalesLogix.SLXSystemProvider())
    {
        var datasvc = Sage.Platform.Application.ApplicationContext.Current.Services.Get<Sage.Platform.Data.IDataService>() as Sage.Platform.Data.IDataService;

        int concurrentAvailabelCnt = provider.GetConcurrentAvailable(datasvc.Server, 1706, datasvc.Alias);
        string loggedInIds = string.Join(",", provider.LoggedInUsers(datasvc.Alias));
        string[] loggedIns = loggedInIds.Split(',');
        string concurrentUsers = string.Empty;
        string otherUsers = string.Empty;
        foreach(string loggedIn in loggedIns)
        {
            Sage.Entity.Interfaces.IUser usr = Sage.Platform.EntityFactory.GetById<Sage.Entity.Interfaces.IUser>(loggedIn.Trim());
            if (usr != null)
            {
                if (usr.Type == Sage.Entity.Interfaces.UserType.Concurrent) concurrentUsers += usr.UserInfo.UserName + System.Environment.NewLine;
                if (usr.Type != Sage.Entity.Interfaces.UserType.Concurrent) otherUsers += usr.UserInfo.UserName + System.Environment.NewLine;
            }
                
        }
        throw new Sage.Platform.Application.ValidationException(string.Format(
            "Concurrent License{3}  Total:{0}{3}  Used:{1}{3}  Free:{2}{3}{3}Concurrent Users:{3}{4}{3}{3}Other Users:{3}{5}",
            concurrentTotal, 
            concurrentAvailabelCnt, 
            concurrentTotal-concurrentAvailabelCnt, 
            System.Environment.NewLine,
            concurrentUsers,
            otherUsers));        
    }
Viewing all 168 articles
Browse latest View live